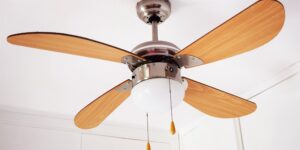
How to clean a ceiling fan and when to do it
Warm weather and ceiling fans go hand-in-hand. The hotter the days, the longer the fans run — and the more that dust collects on the edges of the blades. Unless you want clumps to fling around every time you turn it on, you need to start dusting those blades
How to clean ceiling fans without making a mess
The other method involves climbing a ladder. It’s harder, but you can take care of several chores while you’re up there: cleaning the blades, the motor, the fan’s direction, light bulbs and glass shades. But, of those, the only chore you need to do weekly is dust. The others can be done two or three times a year or as needed.
Here’s what to do:
Before turning off the fan, notice if it’s spinning clockwise or counter-clockwise. If you haven’t done so already, switch the direction the fan spins to accommodate the season. Clockwise warms a room; counter-clockwise cools it. (The more you know!)
Slip a pillow case over the blade, then use the case to wipe the dust off the sides, top and bottom. That way, all the dust stays on the pillow case — instead of going everywhere! Repeat for each blade and remember to press lightly or you’ll damage the blade. (When you’ve come down from the ladder, take the pillow case outside, turn it inside-out and give it a good shake so that the dust comes off on the lawn instead of your floor. Then simply launder the pillowcase as usual.) To reduce future dust buildup, Vila recommends using a dust-repelling spray like Endust (or a DIY version: one part liquid fabric softener to four parts water). Spray it on a microfiber cloth and wipe both sides of the blade.
Motor: Wipe the pull chain and the motor housing with a clean cloth. Spray motor housing with compressed air to remove interior dust.
Light bulbs: Change light bulbs as needed. If bulbs are still working, wipe them with a dry microfiber cloth to remove dust
Glass globe or shades: Remove and wash in warm, soapy water. Rinse and dry completely before replacing. Make sure the mounting screws are tight so the glass won’t rattle or shake while the fan is on.
For extremely dirty blades or kitchen fan blades that are caked with grease, wipe with a damp cloth first to remove dust and dirt. Then apply an all-purpose cleaner, or whatever cleaner is recommended by the fan manufacturer, to a sponge or cloth and wipe each blade to remove grease. Rinse cloth after cleaning each blade and repeat as needed. Then wipe each blade dry.
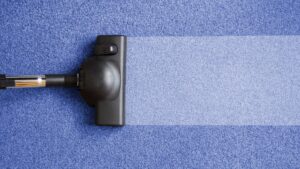
How to clean carpet — and how often to do it
Dirty carpets not only look bad, they’re also loaded with pollutants and grime. These dirt particles act like sandpaper, breaking down carpet fibers every time you walk on them. That’s why it’s important to clean carpets regularly.
Vacuum
The best way to keep carpets clean is to vacuum them s-l-o-w-l-y, back and forth in repetitive strokes. How slowly? says it should take about 15-20 minutes to properly vacuum a 300-square-foot room. Doing so removes 83 percent of the dry soil in the carpet. In the average household, vacuuming should be done at least twice a week.
Professional cleaning
Now here’s a surprising bit of advice. If you want to extend the life of your carpet, it is important to have it professionally cleaned at least once a year. According, most carpet manufacturers recommend the steam-cleaning method. This penetrates deep into the fibers and lifts out the dirt and the many pollutants we track in on our shoes. Also, it removes most of the moisture, so carpets dry fast
DIY steam cleaners
Sure as the sun rises, there will be times when your carpet needs an emergency cleaning. For larger messes, a DIY steam cleaner works, but do not use the cleaning solution that comes with the steam cleaner, cautions. This leaves behind a soapy residue that will attract dirt. Instead, use water and, if you need a boost, a drop of dish detergent or even a bit of white vinegar.
If one of those “emergency” cleanings is due to muddy footprints, offers a time-saving tip. Allow mud to dry first, scrape dried mud off the carpet, then vacuum. Clean remaining stain with steam cleaner or with the water/drop of Dawn solution and a cloth. Blot dry.
Here’s how to clean painted walls without ruining the color
You love your sunshine yellow walls, but that crayon masterpiece your 2-year-old created might not be yoru favorite. Before grabbing a scrubby sponge and your favorite spray cleaner, here’s what a professional painter has to say about safely cleaning those colorful walls. It’s so simple, you may be surprised!
How to clean latex-painted interior walls
cleaning walls depends primarily on whether the paint is oil-based or latex. To safely clean latex-painted interior walls, follow these steps.
What you’ll need:
Dish detergent
Water
Bucket
Distilled white vinegar
Sponge
What you’ll do:
Mix three or four drops of dish detergent in half-filled bucket of water. (Or you can go “old school” using two or three tablespoons of distilled white vinegar to a gallon of water.)
Wet a sponge in the mixture and wring it out to dry. (This is important as you don’t want to mess up your walls with lines of dripping water.)
Wipe off the dirt, rinse the sponge and repeat as needed. This works for all types of latex paint — flat, semi-gloss and gloss.
Make sure the sponge is wrung out dry before cleaning around electrical outlets, light switches and telephone connections. Before cleaning dirty outlet covers, turn off electricity to those areas to avoid shocks.
Bias cautions that you should never use a degreaser or any other harsh chemical cleaners on latex-painted walls. “If marks don’t come off using just soap and water or white vinegar and water, you’ll have to repaint. “
How to clean oil-based painted interior walls
Because oil-based paints are a bit hardier, in addition to cleaning with the detergent/vinegar and water mixture, you can safely use a mild degreaser to remove grease, especially on kitchen walls.

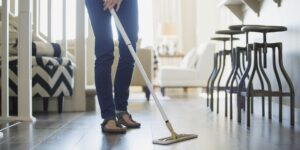
How to mop correctly and the best mop to use
The best mop to use
When first went into business, his favorite tools for mopping were a string mop and a bucket. For years, that’s how and his workers cleaned floors. In fact, if it weren’t for the discovery of one item, he’d probably still be using a string mop today. Since the invention of microfiber, with its thousand-plus fibers per square inch, has changed his style. He now uses a mop that has a reusable microfiber pad instead of strings.
“I haven’t found anything that cleans better than a microfiber pad mop,” “It picks up dirt fast and easily and does the job without bulky buckets.” Just be sure to use the microfiber pad best suited for each type of floor, he adds. Hardwoods and laminates clean easily with a short loop microfiber, while tile floors need longer fibers — or “noodles,” as Aslett describes them — to reach down into grout.
Find the right cleaning solution
For string mops:
recommends an easy cleaning solution: a quick squirt of dish detergent in a bucket of water. “Dish detergent is made to cut through grease and grime. Just don’t use too much or the floors will be dull.”
For microfiber pad mops:
The best part about mopping with microfiber is that you only need plain water and a small amount of your favorite cleaning solution, which often saves money.
How often should you mop?
To put it simply, you should mop when the floor looks dirty. For small households, this may be every other week; for households with kids and pets, it may be once a week or more.
How to mop
Start with a floor that’s well swept, vacuumed or mopped for dust. Otherwise, you’ll be pushing food, dust bunnies and who knows what else all around the room.
String mop method:
For lightly soiled floors, wiping just once with a damp mop may do the job. For heavily soiled floors, you’ll likely have to mop twice. The first time, wet the entire floor (don’t flood it, just get it good and wet). This will loosen the dirt and any sticky goo. Mop around the edges first, then move to the middle of the floor, using overlapping, figure-eight strokes. When one side of the mop gets dirty, turn the mop over to the clean side. When both sides are dirty, wash the mop in the bucket; otherwise, you’ll be spreading dirt around instead of removing it. If any stubborn soil remains, remove it with a scrubber before rinsing.
How to clean a keyboard — and how often you should do it
Ah, our computer keyboard — we pound on it for hours with Cheetos-stained fingertips, yet we never give a thought to cleaning it properly. But we should. Let’s face it: keyboards are disgusting. That’s why TODAY Home checked with Logitech and Apple for advice on how to clean keyboards (on laptop or desktop) properly. They should be cleaned one to two times a month using the steps below.
ecommends the following cleaning tips:
The first thing you want to do is turn the keyboard off or disconnect it from the computer before cleaning. “It’s a safety measure when dealing with electronics,” said . “Plus, you don’t want to accidentally send someone an email.”
Use only a damp, soft cloth, like microfiber, to wipe the keys and keyboard. There’s a special coating on the keys that prevents the letters from rubbing off. Using harsh chemicals or abrasive materials to clean the keys could irreversibly damage this coating and cause an even bigger problem later.
When it comes to removing dried-on gunk from hard-to-reach places on the keyboard, recommends using a slightly dampened swab or a dry, soft toothbrush.
To clean out dust, particles and crumbs, use a can of compressed air. Just make sure to use the straw that comes with the can and never spray while holding the can upside down. Doing so may cause propellant to spray on the keyboard. Don’t have compressed air? suggests turning the keyboard upside down and shaking or tapping it gently to dislodge debris.
Because laptop keyboards sit atop the electronic components of the computer, extra care should be taken when cleaning them. Here are the instructions that Apple gives for cleaning a laptop
Disconnect the laptop and allow it to cool.
Wipe the keyboard using a, clean, lint-free microfiber cloth that’s lightly dampened with only water. Avoid getting moisture directly into any of the openings. Never spray water directly on the keyboard.
To remove debris from between the keys, use a can of compressed air. Make sure the straw’s attached to control the airflow. Do not turn the can of compressed air upside down while spraying. This could spray propellant, instead of air, onto the keyboard.
Apple recommends the following technique when using compressed air. Open the laptop. Hold it so that the keyboard is at a 75-degree angle, tipping slightly backward. Spray the keyboard with compressed air, moving the can from left to right. Keep the end of the straw about a half-inch away from the keyboard while spraying.
Turn the laptop to the right and spray the keyboard again, from left to right, top to bottom. Then turn the laptop to the left side and spray, left to right, top to bottom.
How to disinfect keyboards
There are times when you may want to disinfect a keyboard, especially when using a public computer or one with multiple users. According to Apple’s website, use Lysol Wipes or Clorox Disinfecting Wipes to do the job. Do NOT use disinfectant sprays or wipes containing bleach
First turn off the computer, unplug the power cord and remove the battery if cleaning a wireless or portable keyboard.
Using light, gentle strokes, wipe the keyboard first with a disinfecting wipe. (If a wipe is too wet, squeeze out excess liquid before using it. Don’t allow the liquid from the wipe to remain on the area too long.) Wipe again with a damp, soft, lint-free cloth, such as microfiber.
Dry with another soft, lint-free cloth.